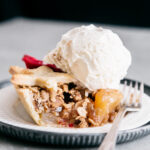
Browned Butter Apple Crisp Pie
A doctored apple pie mix is nestled inside an all butter pie crust and topped with a glorious browned butter crisp that is sure to satisfy all your apple browned butter desires.
Servings: 12
Ingredients
For the Crust:
- 2 Cups All Purpose Flour
- ½ Teaspoon Salt
- 3 Tablespoons Granulated Sugar
- ⅔ Cup Salted Butter, cold and cut into cubes
- 5-6 Tablespoons Cold Water
For the Browned Butter Crisp Topping:
- ¾ Cup Salted Butter, browned (reserve 1 Tablespoon for the filling)
- ¾ Cup Dark Brown Sugar, packed (light or golden is fine too)
- ¼ Cup Granulated Sugar
- ½ Cup All Purpose Flour
- ¾ Cup Old Fashioned Oats
- ½ Teaspoon Ground Cinnamon
- ¼ Teaspoon Ground Nutmeg
For the Filling:
- 2 21-Ounce Cans of Apple Pie Filling (I used Lucky Brand)
- 1 Teaspoon Pure Vanilla Extract
- ½ Teaspoon Ground Cinnamon
- ¼ Teaspoon Ground Nutmeg
- 1 Tablespoon Browned Butter (reserved from the crisp topping)
Instructions
- For the Crust: In a standing mixer or by hand, combine your flour, salt, and sugar. Work the chunks of butter into the mixture with the paddle attachment (or with a pastry cutter if working by hand) until it resembles wet sand. Add the cold water and mix until a nice dough forms. The dough should not be sticky whatsoever and should be solid to work with even before chilling. I want to stress that you do not need to chill the dough, but I find it easier to make pie crust the evening before or even a couple of days prior to making the pie. It is one less step in the baking process on the day of, and this pie crust will remain great in the fridge for at least a week.To make the red and blue stars, like on the pie in the photo, simply remove two small balls of dough slightly larger than a golf ball each. Using whatever food coloring you prefer, color each dough ball until the depth of color that you desire is reached. I use two drops each of American colors, blue and red food coloring. Roll your dough out onto a floured surface and press your cookie cutters into the dough, creating the shapes you desire. For the rest of your dough, roll it out until it is about 12 inches in a rough circle. Press it into your pie pan, trimming the edges as desired, and set it aside when you make the filling.
- For the Crisp Topping: Begin by mixing all of your dry crisp ingredients together. Set this aside. Now it is time to brown the butter.While the actual browning of the butter is fairly simple, you will want to keep a close eye on it and be cautious because it can get bubbly and very hot.Place your butter in a saucepan on the stove over medium to high heat. Once it fully melts, stay close. Whisk the butter as it bubbles and browns, and watch to be sure that beneath the foamy butter that rises, your butter isn't starting to burn. This should take no more than one to three minutes, depending on your burner temperature. Remove the brown butter from the heat.
- Reserve one tablespoon for the filling. Immediately pour the rest of the butter it over your dry crisp ingredients. Mix well until a nice crisp topping forms, and no dry ingredients remain unmixed. Set this aside while you prepare your filling.
- For the Filling: Place all of the pie filling ingredients in a medium-sized bowl and mix to combine. Put your apple pie filling into the prepared crust, spooning it around to ensure it is evenly distributed within the crust. Crumble your crisp topping all over the apple pie filling and top it with any pie crust cookies that you made.Bake your pie at 350°F for 45 minutes, checking it at the 30-minute mark to ensure that the top isn't browning too quickly. I baked mine uncovered for 30 minutes and then covered it for the remaining 15. It turned out perfectly golden on top, and the pie was completely cooked all the way through, including that amazing buttery crust.
- Allow the pie to cool completely before cutting into it, as this is a bit more crumbly of a pie and needs time to firm up. (I cut mine a bit too soon, and it was absolutely delicious but fell apart a little bit. If you aren't worried about your pie falling apart, you can dig in after about an hour!).
Notes
See blog for dietary substitutions on dairy and gluten. As this recipe contains no egg, it is easily made vegan as well.